Pages

Monday, April 21, 2014

On Current Obessions

Today, I thought I'd bring you guys something of a different blog post.  I'm going to let you all in on my current obsessions.  And they aren't even scrapbook related!

The Bullet Journal

Untitled

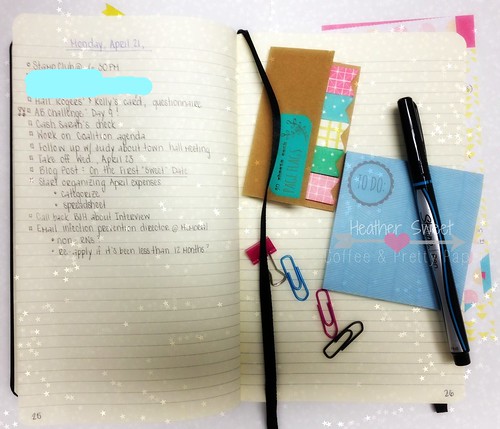
If you guys don't already know, I am OBSESSED with planners and lists and journaling (well, I'm more obsessed with the idea of journaling, but you get the idea).  I am always trying to find new and productive ways for me to organize my life.  Well, I'm pretty sure I have found it.  The concept behind and the details about the Bullet Journal can be found on this website.  Here's how I use it: as a brain dump.  I have everything in one notebook.  Or, I'm trying to condense all thoughts, to dos, lists, etc. in one notebook.  I use a page-a-day to write out events, birthdays, to dos, thoughts, ideas, blog posts, what happened through out the day.  AND I LOVE IT!  Now, I still use my trusty and lovely Filofax, but that kind of planner isn't set up in a daily format, with enough room to write down the day-to-day happenings.  I still use my Filofax.  I like seeing the monthly calendar and the weekly 2-page set up.  My bullet journal just lets me note the million to dos as the day goes on and my thoughts throughout said day.

I use a key to note which bullets are to dos, thoughts, events, priority, etc.  It's basically similar to the above link.  I also don't use all the cute stuff that I use in my Filofax.  I'll use some post-its to transfer from day-to-day if I want to make sure to remember to do something on a certain day.  I use paper clips to mark my monthly task page.  That's about it though.  I think that's what makes it usable on a daily basis, for me at least.

I will do a future post exclusively on my bullet journal.  I'll go into more depth in that post.  But this leads me in to my next obsession, which is where I heard about the bullet journal...

The Girl Next Door Podcast is amazing!  These girls are awesome!  I've never really listened to a podcast until I heard about them.  They have a weekly show on which they sip on a lovely cocktail (the recipe is always included in the show notes) and talk about life.  Each week, they have a certain situation they discuss, they go into things they are really digging at the moment, and then they end with some neighborly news.  Erica and Kelsey are funny, down to earth, and just real people.  Obviously, they have lives, but man, I wish they had a daily podcast!  I HIGHLY recommend The Girl Next Door Podcast!


And to bring you to my last current obsession, Coffitivity.  This site is great!  For those of you that like working in coffee shops, whether it be to plan for the week, work on blog posts, or homework, you will love this site.  Apparently, there is research that states higher productivity in semi-quiet, low hustle and bustle coffee shops than a complete quiet space or heavy racket space.  I head to this site as soon as I get to work to get my productivity going.  It really is amazing.  I love working in a coffee shop or cafe, this website just brings the coffee shop to you!

What kinds of things are you guys obsessing over right now?

xoxo,
Heather

Monday, April 14, 2014

Make It Monday: DIY "Enamel" Dots

Welcome everyone to the beginning of a new week!  As much as I dislike Mondays in the work force, there is something very refreshing about having a "blank slate" for the week ahead.  This may be the opposite for some people, but Mondays usually consist of a completed to do list for me.  I think, sub-consciously, I want to get all my priorities out of the way for the spontaneous things that seem to pop up towards the end of the week with Mr. Sweet and me.

But, the discussion of productivity and the gratitude of life will be discussed at a later date here at Coffee & Pretty Paper.  I am here, today, to show you all how I made my own "enamel" dots as seen here on the Practical Scrapper Frugal Finds post.

This is not original on my behalf.  It's all the rage lately.  And for me, it seems like this technique just seemed to flood the scrapbook forums, YouTube, and Pinterest just recently.  I had absolutely no idea about this ingenious idea until I stumbled upon this pin on Pinterest...

http://www.papercraftsconnection.com/blog/2014/02/groovin-with-the-go-to-gals-diy-enamel-dots/
DIY Enamel Dots via PaperCrafts & Scrapbooking blog
And this blog post is barely 2 months old!  Of course, I fell in love with this idea.  I am trying to be more thoughtful about my scrap product purchases.  And I love me some enamel dots, but I've always had such a difficult time spending $4-$5 on a package of 40+ (if that sometimes).  I'm also trying to be more DIY-y (if that's even a word).  I'm obviously creative and I want to expand my paper creativity to other craft types.

Anyways, long story short...Practical Scrappers hosts a monthly post all about frugal finds.  April's theme was an open buffet of sorts, so it was a perfect time to try out this new-to-me technique.

The Materials

Now you see me...

I purchased perler beads and small pony beads from JoAnn for this fun adventure.  The perler beads were $4.99 AND I used a 40% off coupon.  There are larger amounts available and packages of single colors.  I wanted to start small with a variety of colors.  As you can see in the photo, 2,000 beads is not small, but that's the smallest variety pack available at my JoAnn.  I won't be buying any enamel dots in those colors for the next few decades...

I also wanted to try the pony beads because of the different material.  I did not want the large pony beads though, as I tend not to use those large enamel dots as much.  I was able to find a 5mm variety color bag of pony beads at JoAnn for $2.99.  I went this size because I was hoping they would turn out a bit smaller than the melted perler beads.  (They did not, as you will see below.)

The How-To

The above pin linking to the PaperCrafts & Scrapbooking blog has a tutorial. I did not use that one, but used this video I found on YouTube by corenescreations.  I used parchment paper to place my beads on to.  DO NOT USE WAX PAPER!


Perler Beads:  I melted these little guys in the oven at 275 degrees F for 30-40 minutes.  It seemed to me that certain colors, e.g. black and light brown, took longer to melt.  Even after 40 minutes, the center hole wasn't completely filled in.  Next time I melt these, I think I'll set the oven to 300 degrees F and start paying attention around the 20 minute mark to the melting process.  Also, there was absolutely no smell while these things were in the oven.

Pony Beads:  I melted these guys in the oven at 425 degrees F for 8-12 minutes.  The first batch I put in, the beads were completely melted in 8 minutes.  The second batch took 12 minutes because it was a slightly larger baking sheet.  There was that distinct melting plastic smell when I these were in the oven.  I turned my oven fan on high and had a couple windows open in my house (because of the gorgeous spring-like weather we experienced in the Midwest this past weekend).  It did not linger though.  As soon I was done, the smell drifted away...

Untitled
Pony Beads Before
The Aftermath

Perler Beads
Untitled
The perler beads in use (as an embellishment and as a scattering of photo props **clever**)

Pony Beads
Untitled
The pony beads straight from the oven!

The Obligatory Comparison Photo
Untitled
Pony beads in yellow and blue on the left; Perler beads in yellow and blue on the right
I tried to pick similar colors for the comparison photo.  It seems to me, especially in person, that the pony beads have more of a shiny, true enamel-y (is that a word?) finish, whereas the perler beads are a little more dull.  The pony beads also have more of a rounded dome-shape to them, whereas the perler beads are less dome-shaped and more flat on top.  

Overall, this will definitely be my go-to for acquiring those certain colored enamel dots.  Does this necessarily mean I won't buy any enamel dots ever again?  Probably not, but it's nice to be able to make these myself in almost any color imaginable.  

This is also a good project to take on during a laundry or cleaning day at home.  Because you just pop it in the oven, no prep or clean up, it's easy to do while doing other chores.  

I hope you guys liked this Make It Monday tutorial!  Let me know if you guys have tried it and what your thoughts are about this technique.

xoxo,
Heather

Saturday, April 12, 2014

Now You See Me...Now You Don't: Practical Scrapper's Frugal Finds!

I am up over on Practical Scrappers for a frugal finds post!  Here's just a little sneak peak of my project...

Untitled

Head on over to the Practical Scrappers blog to see my project reveal, as well as check out some other frugal finds projects!

Make sure to come by my blog on Monday for Make It Monday to see all the details and tutorial on my frugal find!

xoxo,
Heather

Friday, April 4, 2014

Just Two Midwest Girls Scrap Challenge: Quotables!


Welcome back to another monthly Just Two Midwest Girls scrap challenge!  Before we dive into April's challenge, let's announce the winner for March!  March was all about getting sketchy.  And the winner is Heather Adams! Go check out Heather's project on her blog.  Heather, please email me your mailing address at heather.sweet12@gmail.com so I can get your lovely prizes into your craft room!  And, just a little reminder, this was the prize up for grabs:


Okay, now to get on to this month's challenge.  For my birthday, Kelly sent me a mixed media spiral notebook, clear gesso, and a mini mister...because she is sweet, thoughtful, and awesome!  

When Kelly and I first met as pen pals, we wrote about how we both wanted to start art journaling.  Well, a year later, Kelly put our creative dreams into action!  When she sent me this lovely birthday package, she had a note in there that said something about just diving right in.  I thought our challenge this month would be the perfect starting point to my art journal:  creating with an inspirational quote.


DSCN2712

My first ever art journal page!  I can't even begin to tell you guys how much fun I had when creating this page.  It really is freeing to just get messy.  Besides the perfectionist side of me freaking out about art journaling, another aspect I will have a difficult time with is not using dimensional elements as much.  But, I can use layers, lots and lots of layers!

DSCN2713

I thought this quote, from Mary Oliver, would be a great way to start my art journaling journey.  If you can't tell, I'm also trying to dabble with calligraphy, but I need to practice and get better with my flourishes.  

DSCN2716

So, this month's challenge is to use any quote as an inspiration to your creativity.  Create anything!  It doesn't have to be an art journal page.  It could be a layout, a card, canvas art, anything!  Kelly and I want to see what quotes are inspiring you creatively!

How to Play Along
  1. Create a new project inspired by a quote you love.
  2. Link your project to my comments section on this post OR Kelly's comments section on her post OR onto our facebook page, which can be found in my side bar.
  3. Link up your project by 8 PM CST Thursday, May 1st for a chance to win this month's prize.


April's Prize


A Teresa Collins Memorabilia Collection Kit is up for grabs!

Coming Soon
Kelly and I will be creating a Just Two Midwest Girls Scrap Challenge blog!  We were thinking that hosting a challenge on two blogs may be confusing and a barrier to participation, so we thought creating a scrap challenge blog would be a great solution.  We will be working on the new blog this month and will launch it with our May challenge. 
What this Means  All of the Just Two Midwest Girls scrap challenges will be hosted on the new blog.  You can still read about our projects on our respective blogs, but anything having to do with Just Two Midwest Girls will be linked back to that blog.  We will still have our facebook page.  When playing along with us, you can link your project to just one blog, without having to scroll through blog posts to find the scrap challenge post.

Okay, now hop on over to Kelly's blog to see how she was quotably inspired!  And don't forget to play along!  You just may win (insert prize)!

xoxo,
Heather

Wednesday, April 2, 2014

Practical Scrappers Full Reveal: Sketch Layout

As promised, here are some more detail shots of and the story behind this layout.  Yesterday, on the Practical Scrappers blog, some of the other ladies and I shared our take on April's layout sketch.


I stuck pretty closely to this sketch.  That is what I love about sketches:  they can be interpreted exactly as the sketch or they can be used as an inspirational starting piece to get those creative juices flowing, among other ways sketches can be helpful in scrapbooking.

Full Layout

And here is my full layout!  I used my February Citrus Twist Kit, along with pieces of my stash, to complete this layout.  One of the great things about sketches, for me at least, is how quickly they come together.  This layout was completed, journaling and all, in a little over an hour (if I had to guess).

Photo Cluster

The Story Behind This Layout
This is a photo of my younger brother (many, many years ago) and our childhood dog, Mikey.  We probably got Mikey when I was in middle school.  We only had him for a couple years.  My childhood home was pretty small for 5 people.  Add a highly energetic dog to the close quarters and you get, what I like to call, a renegade Mikey!  

Embellishment Cluster

Mikey's previous owner was an elderly woman.  He was not trained very well.  Whenever we opened the doors at home, Mikey would fly out if we weren't paying attention.  And boy, could that dog run!  He would run for blocks!  All three of us (my brother, my sister, and myself) would chase after him.  It would get so frustrating!  

Title

As I mentioned before, we only had Mikey for a couple years.  My parents realized they just didn't have the time and space for such an energetic dog.  My mom had a coworker at the time who lived on some land with a few other dogs.  She was happy to welcome another dog to her loving dog friendly home.  

Mikey was the only dog I had until Michael and I rescued our dog, Willie, in 2009.

So, there's some more detailed photos of my layout and the story behind Renegade Mikey.  Hope you enjoyed it!

Don't forget, Just Two Midwest Girls scrap challenge is still going on until 8PM CST on Thursday, April 3.  Click on the facebook link in my sidebar for more details on how to play along!

xoxo,
Heather

Tuesday, April 1, 2014

Sneak Peak: Practical Scrappers DT Layout Sketch

Can you all believe it's April already?  My goodness, time has just been flying!  Although, I am very happy with this warmer weather that is finally making its way into the Midwest.

So, what better way to kick off the month with some creative inspiration?  I am here today to bring you all a little sneak peak of the layout for the Practical Scrappers' April layout sketch.


Zig Zag Close-up 002

Doesn't this layout look fun?  Now, head on over to the Practical Scrappers blog to see the full reveal of my layout, as well as the layouts from some other lovely ladies on the design team.

Don't forget to come back here tomorrow to read the story behind my layout and to see more detailed photos!

xoxo,
Heather