Pages

Wednesday, November 27, 2013

On My Wishlist Wednesday

Happy Hump Day everyone!  I hope you all are gearing up and ready for Thanksgiving.  I know I am!  I'm excited to help my mom in the kitchen and eat food all. day. long.  Now, with Black Friday a couple days away, I wanted to share with you a few more items on my wishlist.  Hopefully, there will be some big sales so I can get a few things! 

The item on the top of my list for the past 10-12 months....drum roll, please...

Silhouette Cameo from Silhouette America
I mean, who doesn't have this on their list that doesn't already own one?  I currently have a Cricut Expression 2, but I just don't use it.  I have 5 or so cartridges, but 90% of those images I don't use.  I love that with the Cameo, you can cut words from fonts already on your computer-for FREE!  I love that you can buy single images.  I love all the free digital cuts out there, or those cut files that come with scrapbook kits/classes, or the inexpensive ones, like these from Two Peas in a Bucket.  I would use the Cameo.  I already use my laptop with the Cricut Expression 2 because it's easier for me to size images and weld them together, so having to use my laptop all the time with the Cameo would not be a con for me.

The Art of Modern Calligraphy, online class on Skillshare
I have totally be loving the look of modern calligraphy. It's just gorgeous.  This class, on Skillshare, sounds really fun.  The class itself is affordable-$20.  There is a list of materials, i.e. the pen holder, various nibs, ink, etc. that are affordable as well.  I added everything up and it would be $16-$18 plus shipping, which I don't think is too bad.  Especially if the nibs will last for awhile, the ink is the only item you'd have to get frequently.  Maybe after the holidays, I'll take this class... And if I do, I'll be sharing my projects and practice lines here, with you all!
Zig WINK OF STELLA Fine Point Glitter Pens, Pack of 12 at Simon Says Stamp
So, you all have heard about those super popular Wink of Stella Glitter Pens?  Well, these are a pack of FINE POINT glitter pens!  The regular glitter pens have a nice brush tip, but these particular pens are fine point, making it easier to go over thin lines, small letters, or to fill in small images.  The colors included in this pack are just awesome!

Viva Decor Paper Pens, Simon Says Stamp

I know this only shows one color-silver, but I want all the colors!  These snazzy little paper pens can be used to make your own enamel dots!  This video, by Jennifer McGuire, shows you how she uses these pens from Viva to make her own dots.  It seems pretty economical to me!  One pen is about $5, but it would last forever!  Where as one package of enamel dots, would only last for a handful of projects.  Yeah, I want one of these pens in every color!

Okay lovely readers, I hope you found some fun things to put on your wishlist.  Hopefully there will be some great sales coming up this holiday season to spoil ourselves.  I'll be back on Thursday to wish you all a Happy Thanksgiving!

xoxo,
Heather

Tuesday, November 26, 2013

"Year One: 2013" Layout

I know, it's supposed to be Project Lifein' It Tuesday, but I haven't completed a Project Life spread.  I do apologize.  But, I have a layout for you instead!  I haven't shared a layout in awhile, so I'm excited!  As you guys know from my video here (go check it out!  It's my first one!), that it's been quite the creative challenge for me recently to make a layout...


This layout here, came together so quickly!  I am so happy with it.  I didn't feel rushed in putting it together.  I didn't feel doubt about doing certain embellishing.  

Elle's Studio, Sketch Thursday

I used this sketch from Elle's Studio.  As you can tell, I followed it very closely.  What drew me to this particular sketch was the triangle cluster on the left side of the page and the banner cluster on the top of the page.  I LOVE BANNERS, so of course, I had to make a layout based on this sketch.  


I recently purchased the Maggie Holmes Flea Market by Crate Paper and the Amy Tangerine Cut & Paste 6x6 paper pads.  I wanted to use them right away.  I thought this sketch with all those triangles (23, to be exact) would be a great way to dig into my new paper pads.  I made my own triangle template/stencil to cut out all my triangles.  I then sewed them down with metallic gold thread (which I am loving right now too).  I love how well these two, very different lines, go together.  The photo is mounted on papers from these paper pads as well.  


This banner cluster was also made with papers from the same 6x6 paper pads.  I used two of my handmade embellishments I made with my Citrus Twist Kits October Main Scrapbook Kit.  The best thing about those pre-made embellishments:  they're made with papers from the Maggie Holmes Flea Market collection (well, except for the ampersand circle...)!  The light pink/dark pink striped ribbon is from a previous CT kit, I think from earlier in the year.  And the anchor flag is from a Studio Calico printable I believe from a class in March or June.  The light blue ribbon is from a Dear Lizzy collection, I believe 5th and Frolic, but I don't know for sure.  Those few things I've had sitting on my desk, waiting to be put on a layout.  The final touch was a splattering of Heidi Swapp Color Shine in Primrose.


Other supplies not mentioned above:  AlphasBegonia Cut Outs Rubber Thickers-Amy Tangerine Cut & Paste; Stamps: Citrus Twist Kits September Main Scrapbook Kit; Ink:  Stampin' UP! Smokey Slate; Turquoise Arrow: Recorded Heart & Arrow Paperclips by Allison Kreft for Webster's Pages  (all supplies listed here, except for ink, are from CT main scrapbook kits)

In October, my husband and I celebrated our first anniversary!  This layout is to document our year one together.  We had my best friend take some pictures of us at the park where we were supposed to get married.  Long story short about our wedding day, it poured down rain all morning and we weren't able to get married outside at this gorgeous gazebo at this particular park.  So Michael and I decided that we'd visit the park each year on our anniversary.

Alright friends, that is it for me today.  Come back tomorrow to see more on my wishlist.  Black Friday is in a few days!

xoxo,
Heather


Thursday, November 21, 2013

Just Two Midwest Girls Scrap Challenge: "Kill" A Kit!


That's right, Kelly and I finally figured out our official name for our blog challenge series!  AND we have a banner!  Look how adorable we are?!  Kelly designed this banner, so make sure to stop by her blog to let her know how much you love it!

Okay, so, big bummer, no one played along with us for our last challenge, so no one won the $5 gift card to Two Peas in a Bucket.  But, if you guys want to play along with this challenge, you could win a $5 gift card to Two Peas in a Bucket!

Our challenge:  "Kill" A Kit!


Citrus Twist Kits' "Celebrate" October Main Kit

Kelly recently started subscribing to Citrus Twist Kits.  We both get the main scrapbook kit each month. We decided it would be fun to see how much we can create with our September and October main scrapbook kits.  Now, I only worked with the October kit, but I believe Kelly killed her September and October kits.


  Lately,  I've been having a difficult time making layouts.  I've been super excited about starting my December mini album and I've been making Christmas cards, so layouts haven't really been on my creative front burner.  Luckily, I know from past experience that watching scrapbook, card, or Project Life spread process videos, especially Glitter Girl videos, gets my creative juices flowing.  And, to be honest with you guys, I didn't even touch the October kit until last Thursday!  But that night I finished 2 layouts, 2 cards, and started another layout.  Friday I had off work, so I was able to work on "killing" this kit.

I could have made at least one more layout than the three I completed, but as I mentioned earlier, I was having a difficult time getting layout inspired, so I did what I could and didn't push myself.

Something cool I did with the "Playtime Kitten" layout:  the cat die cut is from the Dear Lizzy Polka Dot Party Die Cut package.  The die cut itself was cute, but it was outlined in pink and had "true friend" written in the middle.  I wanted the cat to look more like my cat, so I heat embossed it with gray embossing powder (which I purchased recently, on clearance at Hobby Lobby!).

Also, I'm really getting into making homemade embellishments to have ready for future projects.  I watched this video on YouTube by Ashley Laura where she makes a bunch of homemade embellishments using scraps on her table.  I thought that was a genius idea and a great way to use up your stash and save time in the future.  As you saw in the video, I made a handful of my own embellishments based on what I have been loving at the moment.


So, your challenge this time around is to show us how you recently "killed" a kit.  It can be a monthly/bi-monthly kit you subscribe to or a kit you put together yourself from your stash or during a trip to your LSS.  Link up a video, blog post, and/or photos to my comments section or to Kelly's comments section on her blog.  Anyone who plays along has a chance to win a $5 gift card to Two Peas in a Bucket.  You have until Wednesday, December 4th at 8pm CST to play along!

Happy scrapping!

xoxo,
Heather

Wednesday, November 20, 2013

On My Wishlist Wednesday

I figured I better get back to adding things to my wishlist what with the holidays coming up...*wink, wink*!  

Brush Strokes Stamp Set by Hero Arts

I want this stamp set so badly!  Ever since I saw this video by Nichol Magouirk using this set to make a Project Life embellishment gift set, I haven't stopped thinking about it!  Not only would I like to make a gift set like this, but I can think of so many fun things I could do with this set!  

Tim Holtz Distress Markers, Full Set of 49
I've always been kind of weird about Tim Holtz's Distress line.  I always thought of grungy and dark projects, which is definitely not my style.  Now that I've been in the craft world for a little over a year, I've watched tons of videos, seen hundreds of projects, and seen all sorts of Distress products make pretty things.  And as you all know, I've been super obsessed with watercolors, and these markers make it pretty easy to achieve that watercolor look.

Inside and Out Sayings Stamp Set by Simon Says Stamp
I love making cards.  I'm liking it more and more considering I opened an Etsy shop to sell my cards!  (Go check out my shop, Sweetly Made Designs!)  I have always struggled with sayings for the inside of the card.  This stamp set would be perfect to add to my collection.

Okay lovelies, there are just a few more products you can add to your wishlist as well!  And just in case you don't know, Jennifer McGuire is doing a blog and youtube series, My Favorite Crafty Things 2013, over the next 10 days.  She showcases all of her favorites!  I love Jennifer McGuire's work.  She's very inspiring.  She also has a list of all the products she mentions on each day with links, so it's easy to add to wishlists or shopping carts!  

And a reminder, you all have until tonight to link up your take on the challenge with my dear friend Kelly.  We will randomly pick a person who entered the challenge to win a $5 gift card to Two Peas in a Bucket. Come play along!

xoxo,
Heather

Tuesday, November 19, 2013

Project Lifein' It Tuesday

Happy Tuesday lovelies!  We're getting closer to Thanksgiving (aahhh, next week!) and Christmas!  So pumped!  Anyways, I'm back this week with some Project Life.  I have the end of September and beginning of October to show you all.


This side is the end of September.  I haven't been good at journaling daily or taking any pictures. I've been slacking. The end of the month is completely random.  There were two big events that I didn't document at all.  I'm so disappointed in myself.  Michael's birthday was on the 26th and my last day with my friend before she moved to DC was on the 30th.


I didn't even have dates for these pictures.  Totally slacking.  I used Dear Lizzy's Polka Dot Party for this spread.  I am in love with this collection.  


I tried to keep this really simple mostly because I had no idea what to document! 


The right side is the beginning of October!  I "documented" the first 12 days, but I really only have pictures and a story from UMSL family weekend.  I have also come to the conclusion that I take too many pictures of my feet.  


I've been loving circle cluster embellishments.  They are so easy to create and so versatile.  I don't think I'll ever tire of them.

Okay, so there's some Project Life to inspire you all to document your daily life.  It may be simple, but at least it's done!

Also, don't forget about the challenge I have going on with Kelly over at her blog.  We're challenging you to use the same product(s) as used on a project and create your own project.  Details can be found here.  Those that link up their take on our challenge will be entered to win a $5 gift card to Two Peas in a Bucket.  Come play along!

xoxo,
Heather

Wednesday, November 13, 2013

Inspiration Wednesday

Good Morning my lovely readers!  Sorry that I have been MIA lately.  This past weekend I had a friend in town, unfortunately for something not too happy.  I have been pretty behind in my scrap projects, hence no Project Life post yesterday.  I'm hoping to "work" overtime in my scrap room in the next few weeks to get on top of stuff.  

So now, for some inspiration!  This post will be a bit shorter than last week's post, but it's still focused on Christmas.  I have serious Christmas fever!


Starting in the top left corner and moving clockwise:

This Christmas card from Kristina Werner is part of her Holiday Card Series 2013.  She has tutorials on these holiday cards up on her YouTube channel every Monday, Wednesday, and Friday.  I love every card she creates, but this one is particularly inspiring as she uses Perfect Pearls to "color" the stamped image.  I have a set of Perfect Pearls I bought on clearance at Michael's at the beginning of 2013.  I've never used them.  I didn't really understand how to use them.  Kristina's tutorial showed me how!  Now I'm looking forward to getting in my scrap room tonight and busting out my Perfect Pearls, if only I can find them...

I love this floating shelf Christmas decor idea.  Michael and I got a set of these types of shelves for our wedding.  We finally got them up sometime this past summer.  Right now, I have some cute fall decorations on them.  For Christmas, I'm definitely going to do something like this on our longest shelf.  I think I'll do the word "Joy" or "Peace" depending on the space.  I really like the idea of using a wreath as the "O," so I may stick with "Joy."  I like the rustic look too.  Last Christmas season, I tried to incorporate more of that rustic look into our decor, so this idea will work well!

Chalkboard is so super trendy right now.  And I LOVE IT!  These chalkboard gift tags from Jess at The Examined Life are awesome!  For these, she painted inexpensive wood shapes with chalkboard paint.  You could find these at most craft stores.  You could also get some thin wood to die cut custom shapes.  You could do this with chipboard.  You could put them in your December albums, on scrapbook layouts, on cards.  You could make tree ornaments or decorations!  Love this idea!

Last but not least is this adorable felt quiet book.  I have been wanting to make something like this for my niece.  I don't have any sewing skills except for on paper.  I have done some embroidery, so hand stitching is a basic skill of mine.  But when it comes to using a sewing machine, I have no idea.  I found some patterns on Etsy for quiet books using hand stitching after I read this blog post from Stephanie Bryan on her older blog, Playing House.  I now have tons of ideas and want to start on a quiet book, like, right now!

Hopefully, you all have gotten some inspiration from my post today.  What's been inspiring you lately?  Let me know in the comments section!

xoxo,
Heather


Thursday, November 7, 2013

Sweet & Kelster Challenge: Using the Same Products-Treat Bags!

Hello lovely readers!  Welcome to another Sweet & Kelster Blog Challenge!  Congratulations to Heather Adams on winning the Halloween challenge.  Kelly will contact you about your $5 gift certificate to Two Peas in a Bucket!

Are you guys ready for this challenge round?  This time, Kelly and I decided to create something using the same product!  We both had different takes on this challenge, but that's the beauty of a challenge!  Kelly sent me these adorable treat bags she had purchased from The Plaid Barn I believe last year.  This site is one of those daily deal websites for crafty stuff!  Can't go wrong there!  Anyways, she mailed me 9 treat bags:  5 orange and white striped glassine bags and 4 brown and white striped glassine bags.  

I got these cute babies in the mail Saturday afternoon.  I was already holed up in my scrap room and my mojo was high.  As soon as I opened the package and saw these treat bags, I knew what I was going to do with them.  It was really a spontaneous idea:  a "Thankful" mini album!  The colors were screaming autumn/Thanksgiving, so it was perfect.  And, I save all my paper treat bags from kits, so I definitely had enough bags to cover the 30 days of gratitude.  Now, I didn't plan to make a gratitude album this season.  I get a little overwhelmed with mini albums (I still have one that I've cut the paper for and printed the pictures and haven't done anything since), but I was already feeling the craft-high, so I just went with it.  I was definitely going to journal daily about my gratitude, but a project was not an intention.

So, here's the finished project...


I knew from the beginning that I wanted to hand-paint my title, like in this layout by Garden Girl Kristina Nicolai-White.  And, if you read my post yesterday, you know that I've been obsessed with gold! I just had to try this technique and I love how it turned out.  


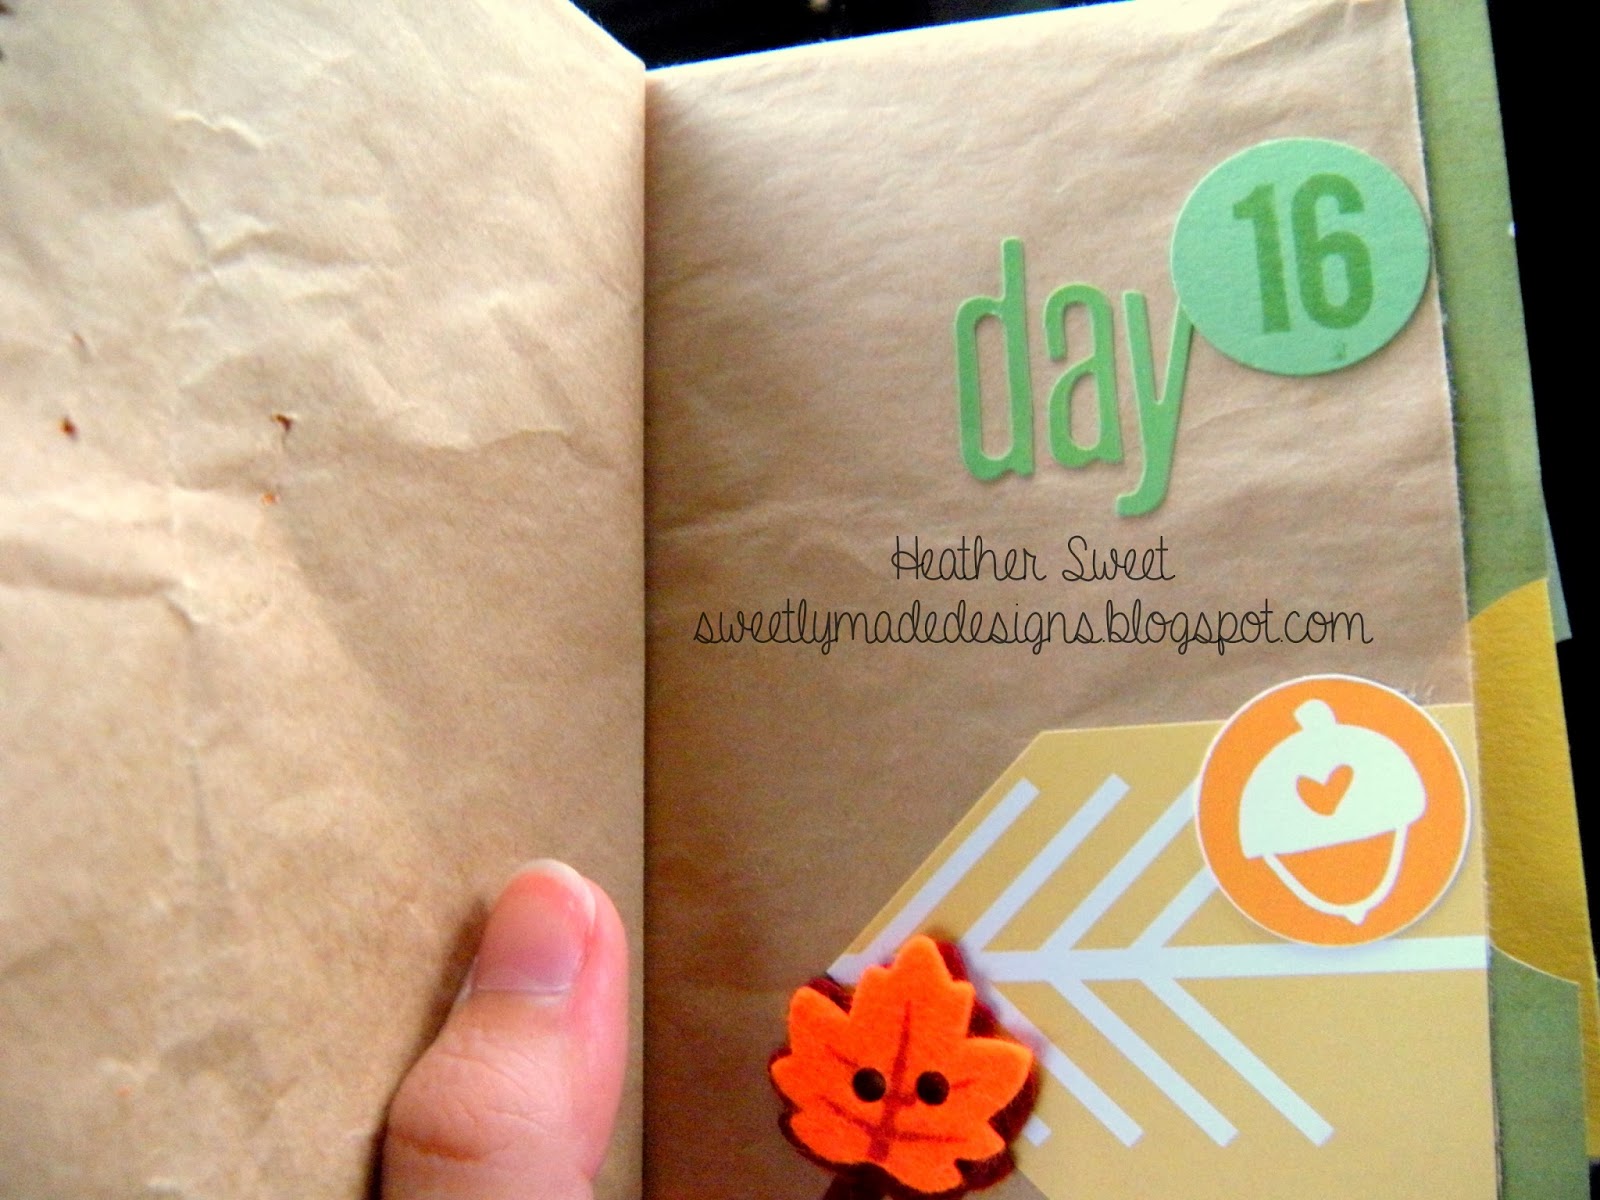
I really wanted to challenge myself beyond using these treat bags, which was to use my stash for embellishing my mini album.  I wanted to stay with the traditional autumn color scheme of burnt orange, deep red, darker/mustard yellow, deep green, and brown.  I pulled everything in that color scheme from my stash.  And let me tell you, there wasn't much.


I do have to let you guys know that I cheated a little.  You see that cute felt leaf, the green sequin leaf, and the fall-themed stickers?  I got those from Michael's Saturday night.  Again, not intentionally.  Michael and I went to get him some sketchbooks and I happened to see a display of fall-themed craft stuff for 80% off!  I got felt leaves, sequin leaves, and fall-themed stickers each under $1! I couldn't say no.  So, I was able to add some fall-themed embellishments to my mini album.  Something I am thankful for!


I had a lot of fun putting this mini album together.  It's simple, but cute and all I have to do is write down what I'm thankful for each day on the piece of cardstock in the pocket and slap a photo on the bag side of each day.  As you guys were hopefully able to see in the tutorial, each treat bag was folded in half to make 2 pockets.  Each pocket will represent a day.  Journaling goes on the pull-out cardstock and a photo will go on the back of the day.  I'm doing a photo daily journal #mythankful30 using a list from @lilgik at feedyourcraft.com.  I am not documenting every photo on Instagram, only because some photos I'll have to pull from my photo library because some of the prompts may not match up to the day (i.e. a bright sunshiny day on November 23rd may not be sunshiny).  


Here's a picture of some of the plain paper bags I used in my mini album as well.  


I still haven't decided how I'm going to bind it.  I did punch small holes in everything, but it's really thick, so I don't know if rings would be a good idea.  Right now I have it all bound with twine, but I don't know if I'll like it.  

Now, it's your turn!  Share a project of yours and someone else's using the same products or kit. Make sure to include the link to your project and the other project in the comments section or Kelly's comments section for a chance at the prize.  Remember, the prize is a $5 gift certificate to Two Peas in a Bucket!  You have until Wednesday, November 20th to link up your project!  Now, go check out Kelly's take on our challenge.  You won't be disappointed; it's super cute!

xoxo,
Heather

Wednesday, November 6, 2013

Inspiration Wednesday

Happy Hump Day lovely readers!  I decided to do something a little different this Wednesday-I'm going to bring you a post full of what's inspiring me lately!  I'll still bring you On My Wishlist Wednesday, but probably only 1-2 times a month.  

Here are some things that have been inspiring me lately.  


Starting from the top left corner...


  • I love the color scheme in this layout by Two Peas in a Bucket's Garden Girl Shimelle.  Lately, I've been loving a bright color paired with black and white.  I also like how this layout uses some journaling cards from the Becky Higgins Project Life Midnight Core Kit.  If you've been reading my blog, you all know how much I love this core kit and since I have hundreds of these cards, new ideas for using them are always appreciated.
  • I am loving these stitched vellum pockets full of little goodies, i.e. sequins, punches, die cuts, wood veneers.  I love the snowflake in this vellum pocket by Two Peas member jrench.  I also like that the pocket is stitched to the top of this page.
  • If you guys couldn't tell by my photo collage, I am feeling so inspired by December Daily(TM) albums, Christmas albums, etc.  I love the page of pocket protectors full of little goodies.  It's such a great way to break up a Christmas album or any album for that matter.  Plus, there's an excuse to use all those holiday-themed embellies you have!  Unfortunately, I wasn't able to find the website I originally pinned this from to give proper credit.  If anyone knows, please let me know.
  • Wilna Furstenberg.  Enough said.  Everything she creates is inspiring!  Besides the super trendy chalkboard look this layout shows, I love the banner underneath her photo.  I've really been meaning to try this.
  • Another Two Peas Garden Girl I admire is Corrie Jones.  This particular layout was made by her for Elle's Studio, but she's created a layout like this for a Two Peas video.  I love the idea of drawing shapes with spray mist.  I lovely way to create your own background/pattern paper.
  • I love how Kristina Nicolai-White painted this title for her layout.  I recently did something like this on an upcoming project I'll be posting on my blog soon!  Get excited!
  • I LOVE GOLD!  I don't know when this happened, but I have suddenly been all about gold-in my crafting, in my clothes, in my accessories. I not only love this quote, but I like how it looks like gold foil.  Just beautiful!
  • These next two inspiration photos are from Michelle Wooderson.  I am in love with everything she creates.  I love her layering techniques, her style, her use of mixed media in a bright, colorful way. I love this sequin pocket with the gold doily.  In this post, she also has pictures of other pockets she jazzed up.  The last photo I cannot find the exact post for, but I love the layering with the tag.  Using tags is one of my favorite ways to embellish a page.  


Hopefully these photos inspire you to create something that you've recently been loving.  Link up what's been inspiring you in the comments section.

Also, you have until midnight tonight to link up your Halloween projects for the Sweet & Kelster blog challenge.  Information and details can be found in this post.  There is a $5 gift certificate to Two Peas in a Bucket for the winner!

xoxo,
Heather

Tuesday, November 5, 2013

Project Lifein' It Tuesday

My goodness, can you believe it's November?!  The last few months have been flying by!  I'm getting so excited for Christmas and can't wait to get my hands on the Citrus Twist Christmas Daily kits.  Yes, I got both the main scrapbook kit AND the pocket style kit.  I couldn't help myself.  I can't wait to get them!

Anyways, here's my (almost) last spread for September.


Guys, I do want to apologize for the quality of these photos.  It's really difficult for me to take photos with natural light because I'm never home when there is natural light flooding my windows.  Unless it's the weekend, but I still haven't been able to work that far ahead.  I am working on it though.  I promise!

Okay, with this spread, I used my September Citrus Twist main scrapbook kit.  I don't know what it is about this month's kit, but I haven't been that inspired to use it, so I'm using any project as an excuse to "kill" this kit.  My October kit is still sitting in it's box and I'm itching to use it!  But I want to try to use as much as September's kit as I can.

Complete side note:  I need to get better at telling stories using pictures that remind me of certain things, triggers memories, etc.  I think that's what has been a barrier for me.  I feel as if I don't have good pictures to scrap or pictures that tell a story, but I have a stack of photos on my table!  I need to channel my inner Shimelle and scrap photos that trigger a memory or something like that.  


I love this "title" card!  I've totally been digging lace doilies and would love to add them to everything!  Also, the exclusive wood veneer that comes in the Citrus Twist kits are awesome!  The "Hello" tag is just such an example. You can't find anything like that anywhere else.  I was totally inspired by Stephanie Bryan's week-long posts about vellum on write. click. scrapbook's. blog a couple weeks ago.  So, in honor of inspiration, I printed my journaling on vellum!  And it was so easy!  Definitely recommend.  I didn't have to do anything special to it.  I just treated the process as I would treat printing on a journaling card.


I purchased the October Add-On stamp, which you can see an image of above, and it's all about food.  I needed a stamp like that because I document a lot of food and meals.  This stamp set will also come in handy with the holidays coming up.  Yum, holiday food....


Look, I made a filler card.  From scratch!  I love that patterned paper from Carta Bella's Hello Again collection.  This patterned paper was in the CT September kit.  I don't think I used anything other than this kit, except for the gold triangle washi, yellow alphas, and the orange/white labels.  It was definitely easier to complete this spread working from a coordinating kit. I don't mind putting together my own kits, but it takes me forever going through my stash.  Having it already done is so much less stressful.

Don't forget, you guys have until Wednesday at midnight to link up your take on the Sweet & Kelster blog series Halloween challenge.  Details can be found here.  There is a $5 Two Peas in a Bucket gift certificate for the winner!

xoxo,
Heather