Pages

Wednesday, July 30, 2014

Currently Loving in July + #currentlylist

Today, I have a handful of random items I have been loving this month. This is something I'd like to do once a month. I really enjoy seeing other people's monthly favorites, so I thought I'd share my own.


Currently Loving 
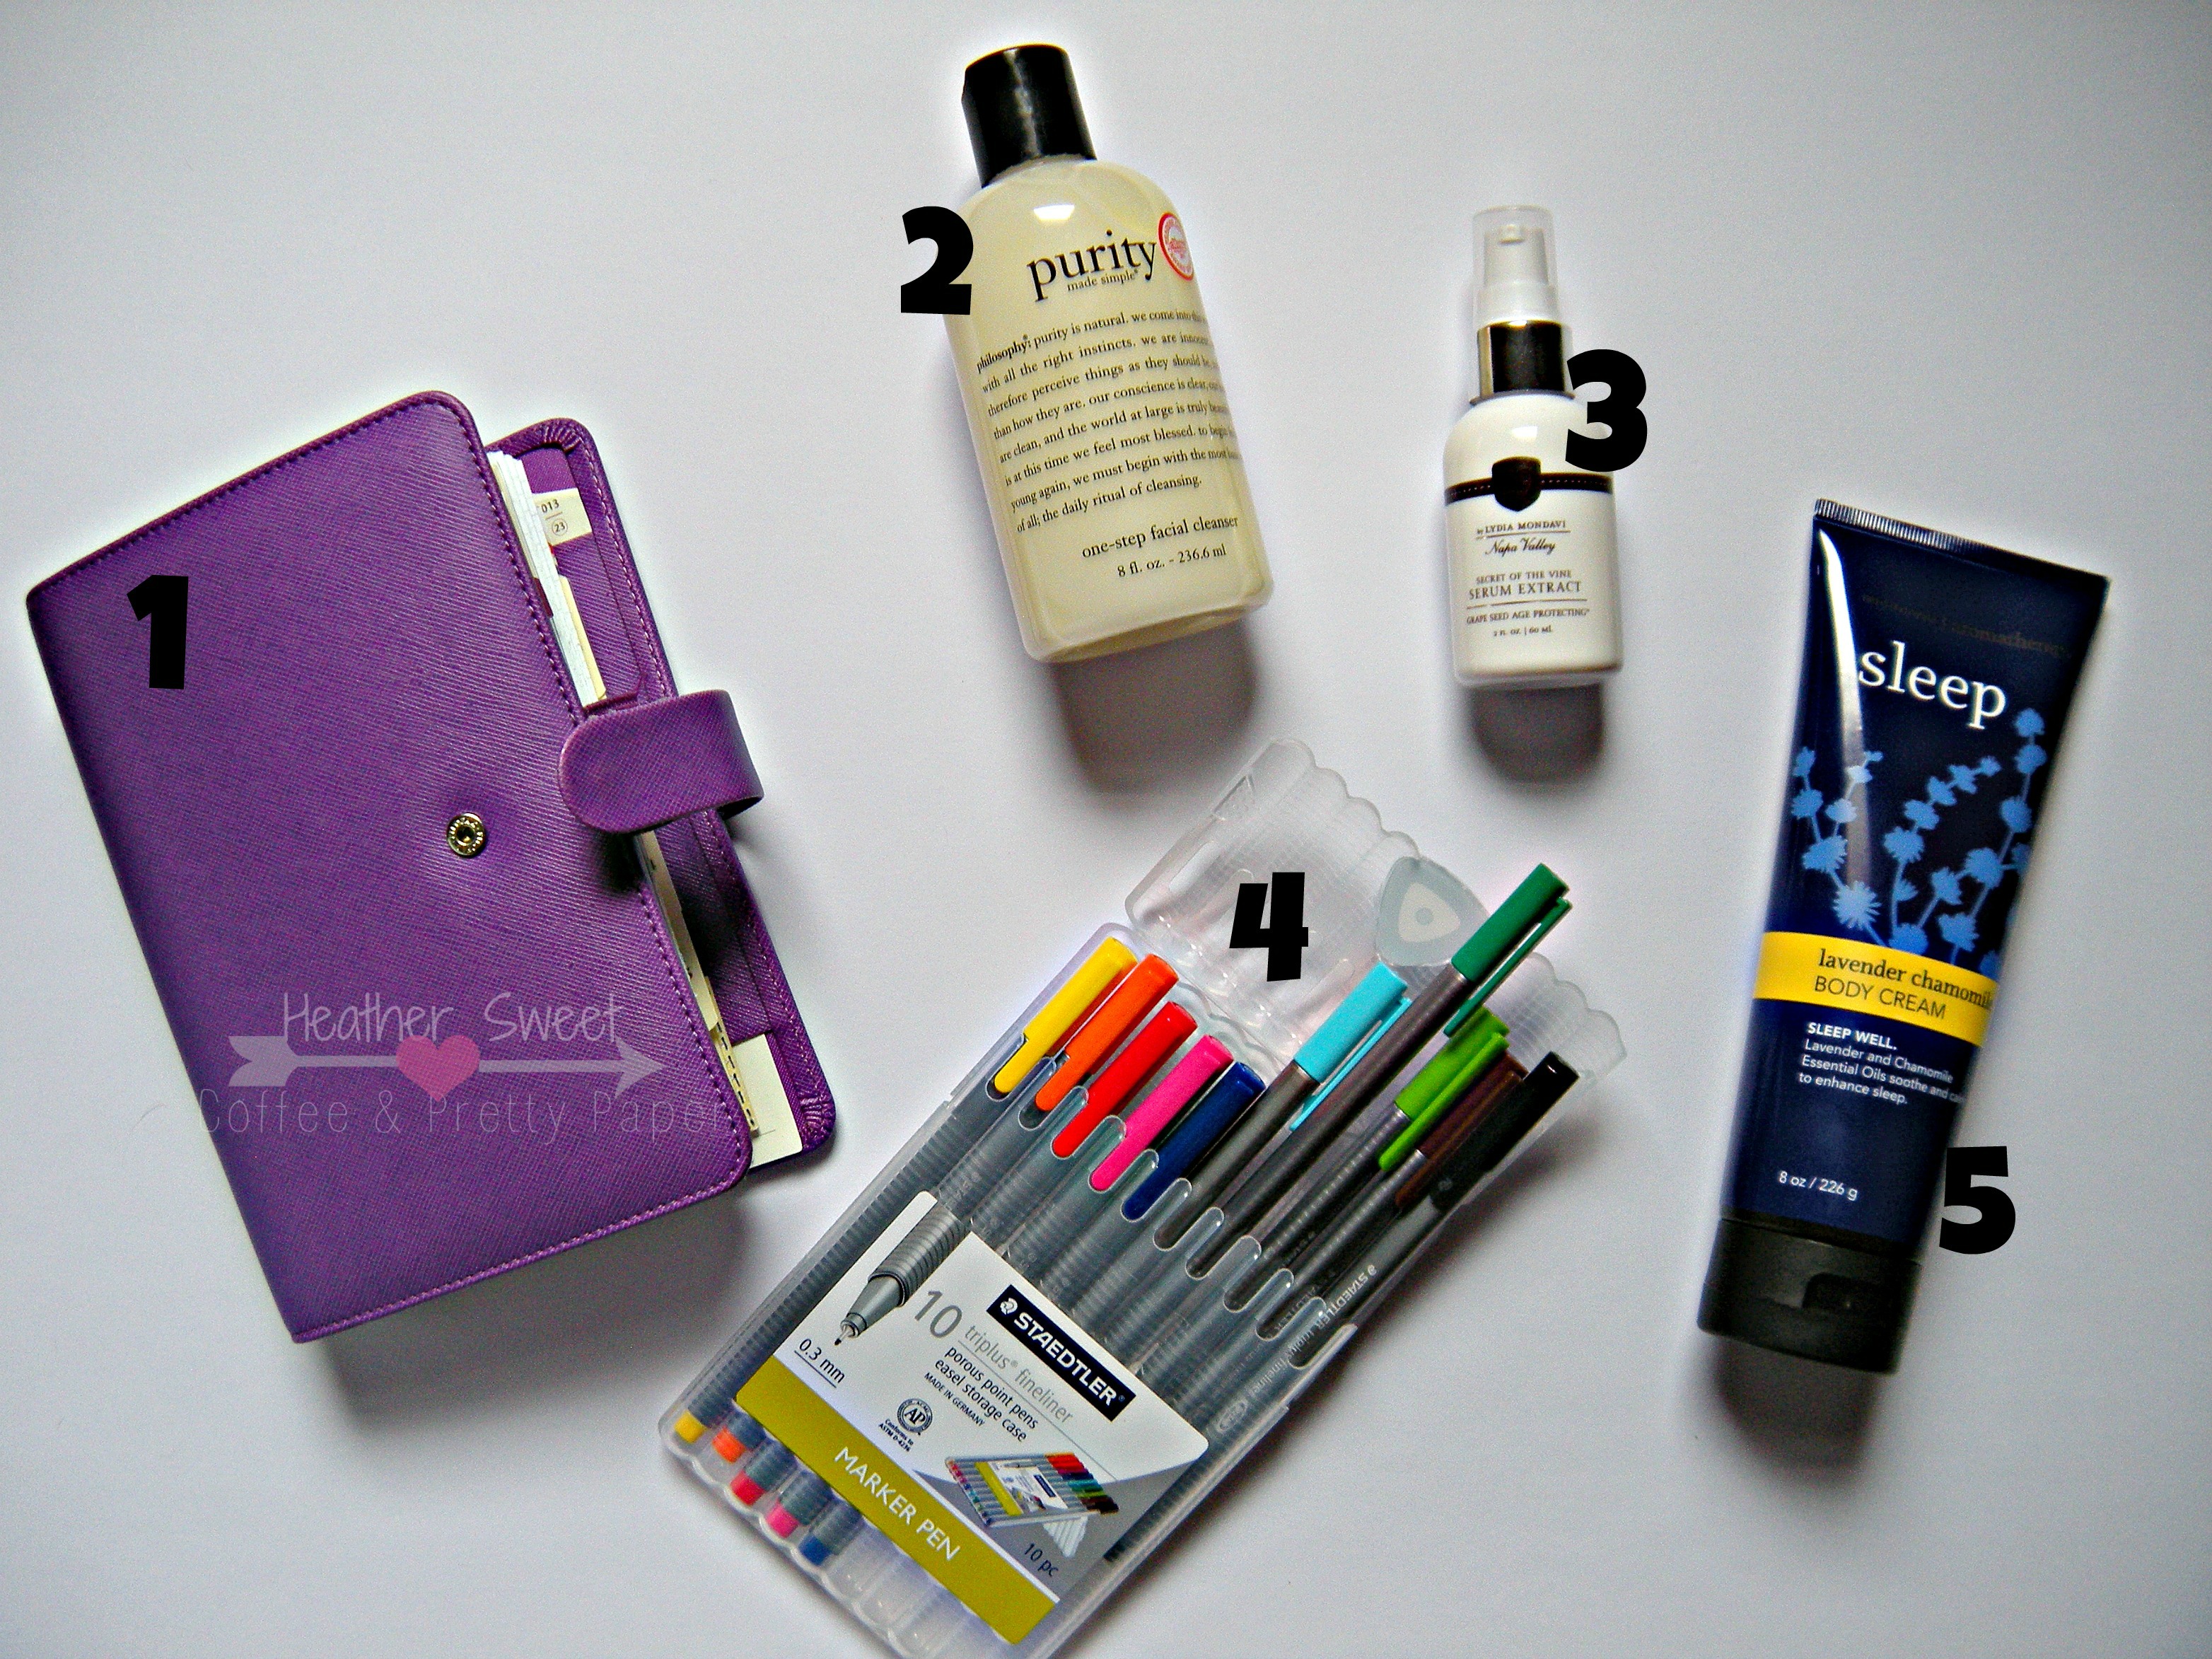
  1. My purple Personal Saffiano Filofax: She's not really a currently favorite, per se, because she's an all-the-time favorite. To put it in more appropriate terms, I'm obsessed with using my Filofax.
  2. Philosophy's Purity Made Simple One-Step Facial Cleanser: Love. I don't know what else to say about it. It leaves my skin feeling clean and soft, as well as looking clean and clear. It will always be worth the money for me.
  3. 29 by Lydia Mondavi Secret of the Vine Serum Extract: It's never too early to start incorporating some anti-aging (I prefer to call it slower aging process) skin care products. This serum is used to improve the skin's elasticity, making it firmer and tighter, all while diminishing fine lines and wrinkles. It smells lovely, a light dose of flowers. I use it as a serum, under my moisturizer most of the time. I've also used it as just a lightweight moisturizer. It does not make my face oily. So far, I like it. I haven't used it enough to notice any differences in my skin yet.
  4. Staedtler Triplus Fineliner Marker Pens: I love using different-colored pens, even though I don't really color code anything when I'm planning or organizing. These are really nice and extremely fine point at 0.3mm. I use them all the time in my Filofax and Bullet Journal.
  5. Bath and Body Works' Sleep Aromatherapy Body Cream in Lavender Chamomile: OH MY GOSH I LOVE THIS SCENT! It really is calming and relaxing. It sits on my nightstand. I HAVE to put it on every night before I settle down to sleep. Highly recommend.
And here's my #currentlylist, inspired by Kristin over at rukristin papercrafts and her currently project.

Untitled

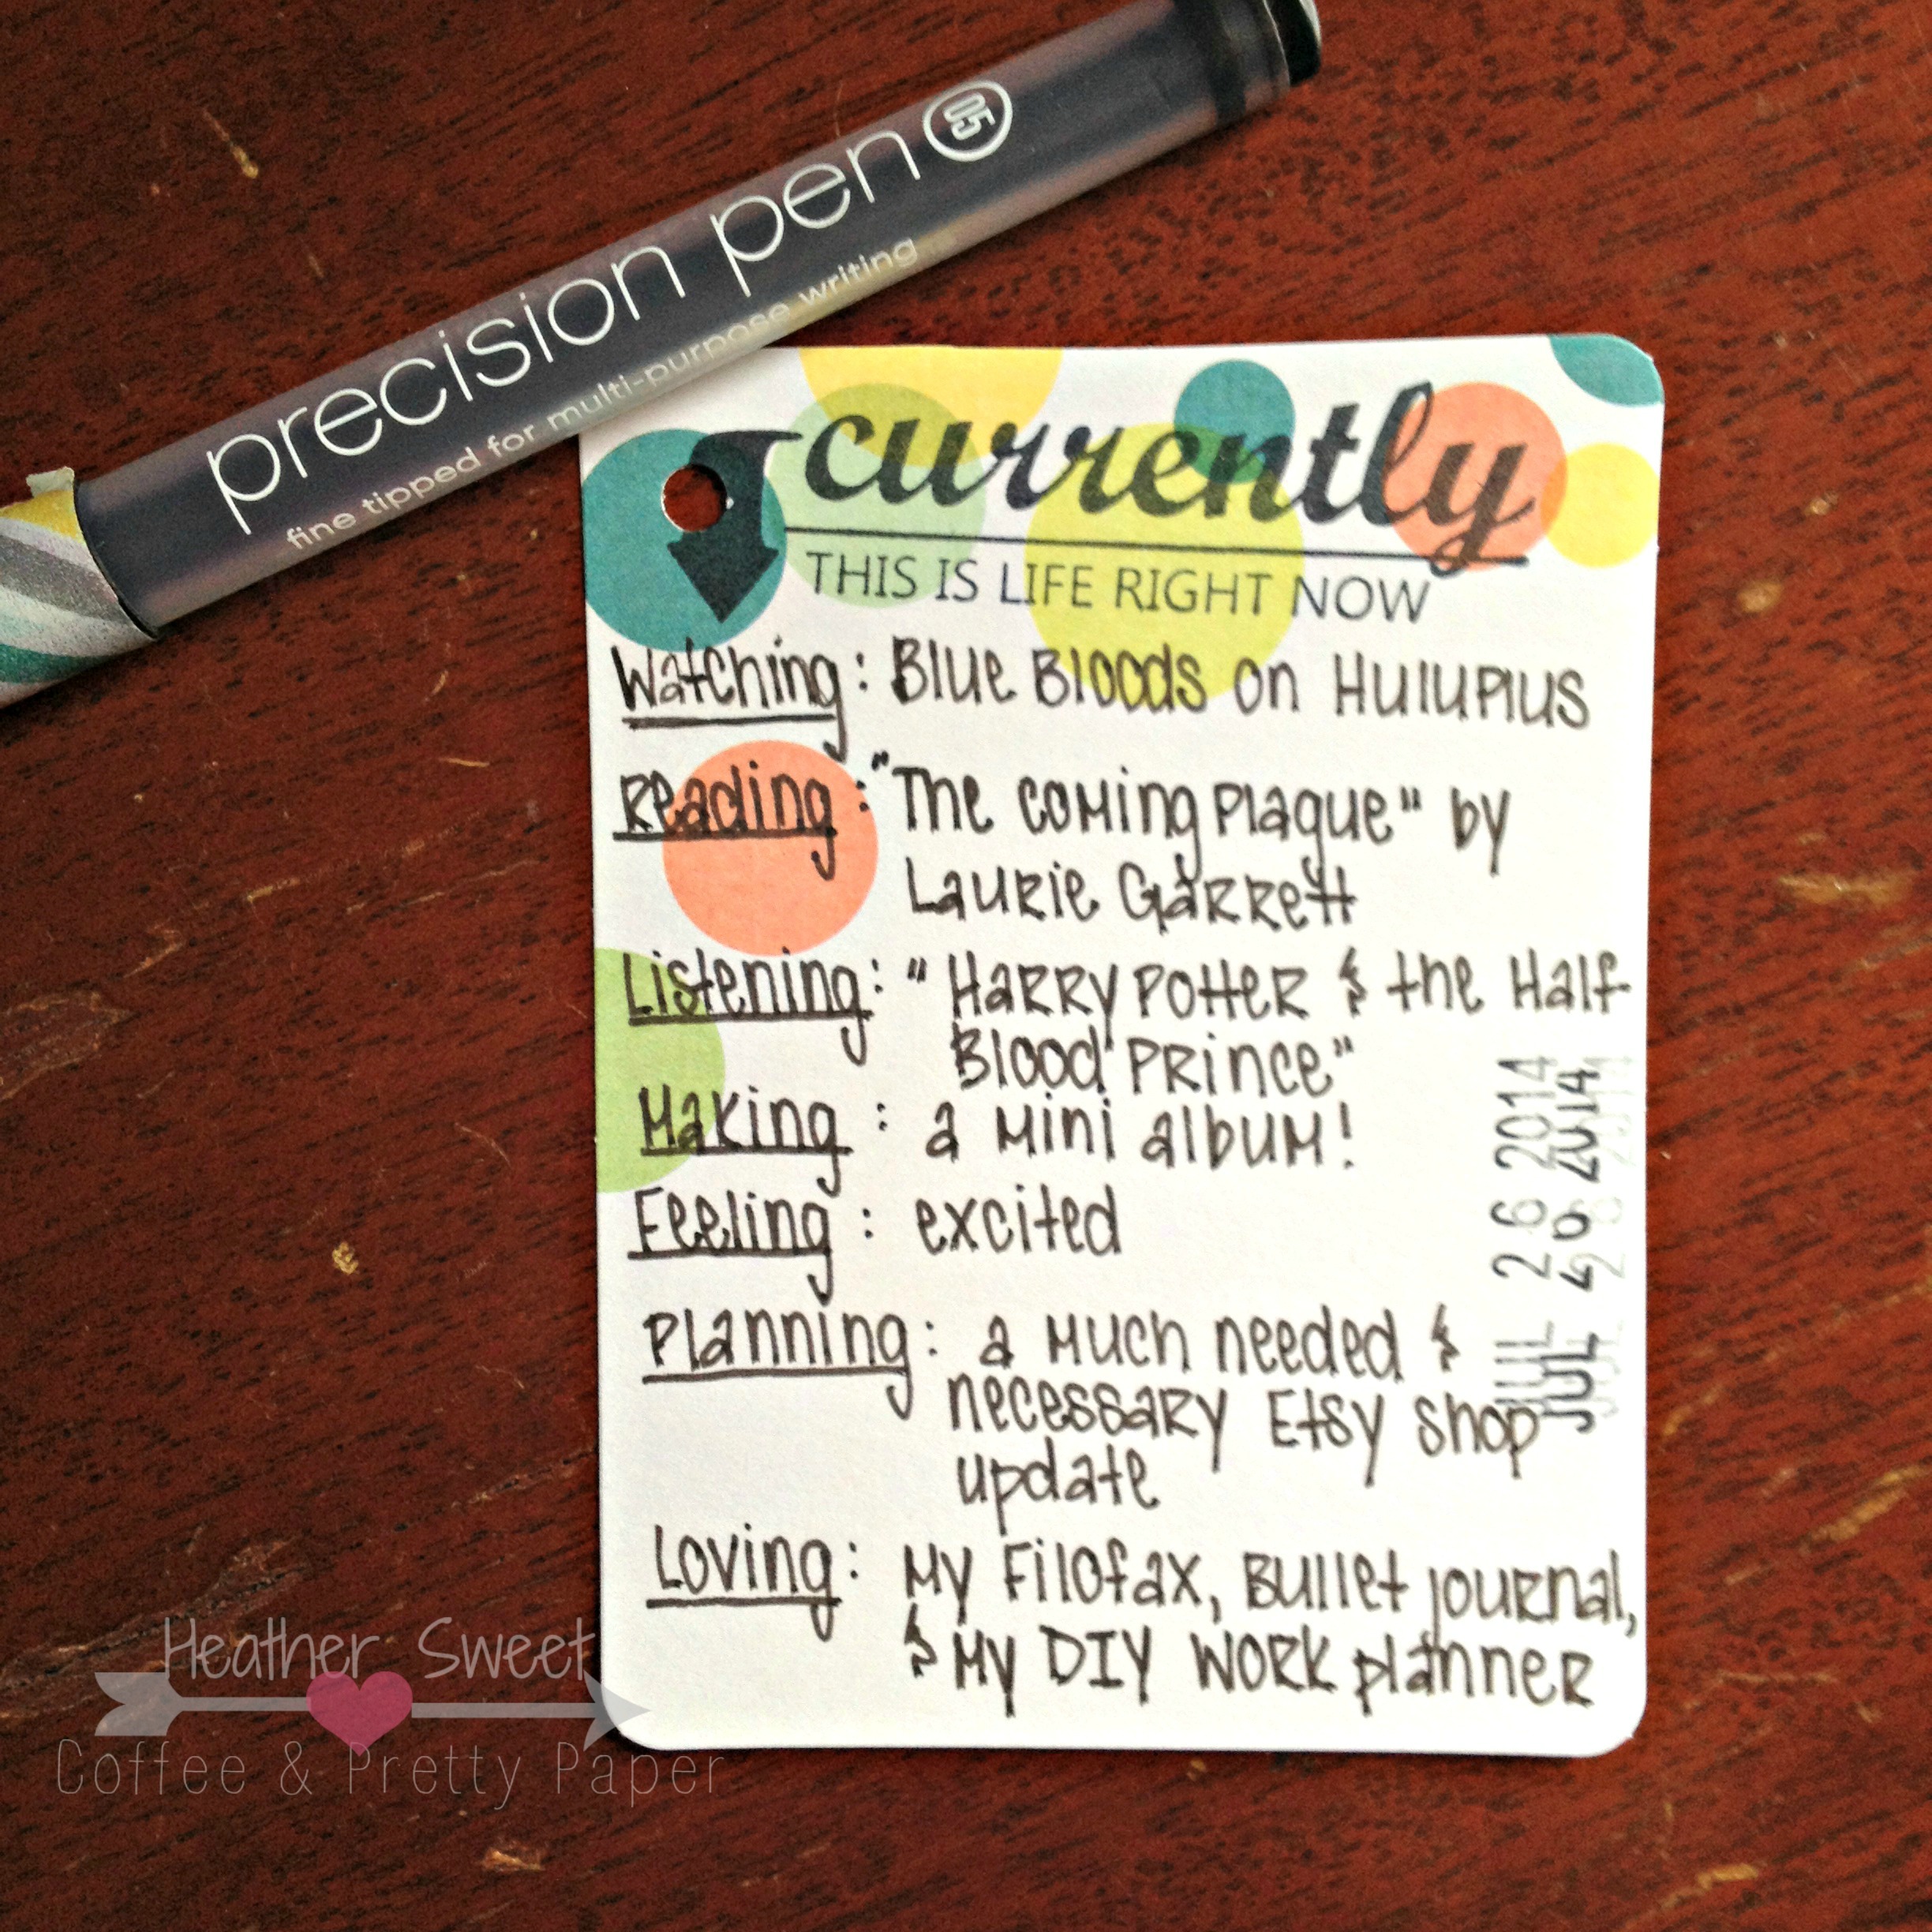
What products are you loving this month? And, if you play along with the #currentlylist project, link up your list in the comments section!

xoxo,
Heather

Monday, July 28, 2014

Make A Card Monday: Hello My Friend

My goodness, I can't believe another week flew by! I'm back on what I hope will be a lovely Monday. Today, I have a very simple, clean, and quick card for you.

Hello My Friend Card

This card was so much fun to make! It came together pretty quickly after I figured out the colors I wanted to use.

How To:
The Card

  1. Cut your white cardstock (8.5" x 11") in half at 5.5" on the long side. This, of course, gives you two card bases. Fold one of the two pieces in half. My card measures 4.25" x 5.5". Round your corners.
  2. Take a piece of washi tape to section off the lower right corner of your card front. This is where you will be stamping the flower images.
  3. Using any small flower stamp image (I used Avery Elle's Oh Happy Day stamp set), stamp the flower a few times in the corner in one stamping ink color.
  4. Using another small flower stamp image, stamp this flower a few times in a coordinating stamping ink color.
  5. My stamp set-the Avery Elle set mentioned above-has a couple flower center stamp images. I used this flower center stamp to stamp a yellow center in the peach-y flowers and the peach center in the yellow flowers.
  6. Using a small flower leaf stamp, stamp leaves on each flower in a green stamping ink.
  7. Remove the washi tape to display that crisp "line" between white cardstock and stamped images.
The Sentiment

  1. Using a peach-y colored cardstock that coordinates with your peach-y stamping ink, die cut the word "hello." (The color coordination of the stamping ink and cardstock was simple, as I'm using Stampin' UP! products.) 
  2. Adhere the die cut "hello" towards the bottom of the card front, making sure to overlap the word slightly with your pretty flower corner. 
  3. I decided to add a little more to the "hello" sentiment. With another stamp, I stamped the additional sentiment, my friend, in black ink, right justifying this smaller sentiment below the larger "hello."
  4. Your card is done!
The Envelope

Hello My Friend Card

Using the We R Memory Keepers envelope punch board, I made my coordinating envelope for my card.
Hint: the WRMK's board does not have the measurement for the common card size of 4.25" x 5.5", but I have those measurements!

  1. Using the same colored cardstock you used to die cut "hello," cut a square 8" x 8". 
  2. Using the punch board, make your first score mark at 3.5", continuing to make your score marks around the square. 
  3. To make the envelope liner, you're going to act like you're making another envelope, but with white cardstock. BUT, cut your square a 1/4" smaller than your envelope. In this case, cut a square 7.75" x 7.75". Still make the first score mark, using the board, at 3.5". 
  4. Depending on how you will have your envelope open, cut the side flaps of the white "envelope" off. Then you're left with the middle of the envelope (or the top and bottom). Cut this piece in half. This will give you 2 white envelope liners.
  5. I used the same stamps and stamping ink on the envelope liner as I used on the card, to coordinate the envelope even more with the card.

Hello My Friend

I hope these instructions made sense. If you have any questions, especially with the envelope liner (I felt that may have been a little confusing), just let me know in the comments section! Supply list is below!

xoxo,
Heather

Supply List

Friday, July 25, 2014

Love for the Weekend!


In an effort for you all to know me a little better, as well as spread the love to other bloggers, sites, etc that I enjoy, I will be posting various links every Friday. These links will be whatever I've found interesting, exciting, or what I've absolutely fallen in love with over the past 7-ish days. Enjoy!

This week, I decided to make my own planner just for work. I was very specific about what I wanted. This post and this post gave me inspiration! More on my DIY work planner next week!

I want this bangle, and this bangle, and this bangle, and this one! Plus, it's all made in the USA!

I've already watched this trailer 10 times today. Can't wait to see this movie...for the obvious reasons! Like, I can't even.

This post is amazing and something I've always thought since this "inspirational" quote started floating around the Internet. (Inspired by Elise Cripe)

Also from the lovely Elise, this wonderful journey she's taking to document her relationship with beautiful daughter during her second year.

Last, but definitely not least, a little something from my challenge blog I co-host with Kelly.

xoxo,
Heather


Friday, July 18, 2014

Love For the Weekend!

Source: Pinterest; Original post: tumblr
In an effort for you all to know me a little better, as well as spread the love to other bloggers, sites, etc that I enjoy, I will be posting various links every Friday. These links will be whatever I've found interesting, exciting, or what I've absolutely fallen in love with over the past 7-ish days. Enjoy!

I am so excited about this challenge! You should join along too! So far, I've completed 4 consecutive days.

While you're at the above link, I discovered this site, which makes me happy. 

I'm excited I found this blog post full of video tutorials. Just another hobby I'd like to take up!

Reading this post, I can identify with some. There are others I need to consciously work toward.

xoxo,
Heather

Wednesday, July 16, 2014

My Milwaukee Trip...in Photos

I'm finally posting some of my photos from my Milwaukee trip at the end of April! One of my best friends in the whole world lives in Milwaukee. It was my first time visiting her since she moved there in July 2013. I miss her tons! I wish we lived closer together, but we do a pretty good job visiting one another and scheduling many phone dates.

Untitled

This trip consisted of talking, food, beer, sightseeing, food, driving around, a belated birthday cake, beer, lots of photo taking, food, baking, Hunger Games, shopping, local restaurants, food, walking around in the Historic Third Ward, antiquing, and did I mention food?

Here are photos. These were all taken with my phone, so not the best quality, but my trip is documented!

Untitled Untitled Untitled Untitled Untitled Untitled Untitled Untitled Untitled Untitled Untitled Untitled Untitled Untitled Untitled Untitled Untitled

Milwaukee is a lot of fun. I would like to go back during the summer months and take Mr. Sweet with me. 

Have any of you been to Milwaukee? What was your favorite thing to do while visiting?

xoxo,
Heather

Monday, July 14, 2014

Make A Card Monday: A Thank You Card

Happy Monday! (I know, the "happy" is questionable.) Let's kick off the week with some lovely card inspiration, shall we?

One type of card I seem to be creating a lot, as well as never seem to have enough of, is a thank you card. This thank you card I recently created to go out with a Just Two Midwest Girls scrap challenge prize winner. But, this card design can be used to thank anyone in your life.

Thank You Card

This card was really fun to make. I used my We R Memory Keepers Envelope Punch Board, which I LOVE! If you don't have one, definitely invest in one. I've been wanting to create this type of envelope card for awhile, but never sat down to make it happen. 

I made an envelope, according to the directions on the punch board, for a 4" x 4" card. Using the envelope I created as my card base, I layered my patterned paper and cardstock inside. On my cardstock, I stamped the flowers using a gold metallic stamp ink right in the center of my square. I stamped the sentiment on white cardstock and cut it into a thin strip to make a banner. I adhered that to my solid colored cardstock, layering three pink/salmon enamel dots on one end to balance the banner cut on the opposite end. Then, I added faux stitching along the edge using my white gel pen.

Thank You Card

Once the inside of the card envelope was complete, I used ribbon to keep it closed. The tag you see on the front holds my message to the prize winner. You can definitely add your message inside of the envelope. I was thinking of making my top layer of cardstock a flip up, adding the message on the next layer. I decided to use a tag on the outside instead. 

Thank You Card

So, the person receiving this fun and lovely card just has to untie the ribbon and open up the envelope to see the "card" on the inside. 

This card didn't take me long to create. I definitely see more cards like this in my cardmaking future! 

What new card designs have you come across lately? Anything you want to try or have tried recently? Let me know in the comments! 

xoxo,
Heather

Friday, July 11, 2014

Love For the Weekend

Source: Pinterest via Earmark Social
In an effort for you all to know me a little better, as well as spread the love to other bloggers, sites, etc that I enjoy, I will be posting various links every Friday. These links will be whatever I've found interesting, exciting, or what I've absolutely fallen in love with over the past 7-ish days. Enjoy!

I have become OBSESSED with this form of planning. I even purchased this trial for August to see how well it works for me. I'll let you know the status of that fun adventure in the weeks to come.

I have been intrigued by the elusive editorial calendar. This post does a pretty good job of explaining it. 

This sounds really intriguing. I'm tempted to try it. I love me a good monthly subscription box!

I'm a sucker for office supplies and sticky notes. Anything to pretty up my planner. I can't wait to get my hands on these, these, and these

I recently discovered this blogger and author, although she's been around for a bit. She's very inspirational. This post was very lovely to read. 

I've been curious about these and a healthy living lifestyle. I'll keep you all in the loop with my journey on learning more about them and incorporating them into my daily life.

xoxo,
Heather

Wednesday, July 9, 2014

MINI ALBUM MAYHAM: Baby Boy Album

**Warning: This post is photo heavy!**

Boy (no pun intended!), do I have lots of mini album inspiration for you all today! I have absolutely fallen in love with mini albums. I used to think of them as extremely intimidating. That feeling hasn't gone away completely, but they have become more fun and less overwhelming. This could be because I've actually created 3-5 mini albums this year already.

Anyways, I wanted to show off this very special mini album that's close to my heart. One of my best friends recently gave birth to her first child, a beautiful baby boy. From the moment she told me she was pregnant way back in early December 2013, I knew I wanted to make a special mini album for her to document her baby's first year.

Baby Boy Mini Album

It took a lot of restraint not to buy everything baby in between the announcement of her pregnancy and the announcement of the sex of the baby. I was itching to start creating, but having to wait to hear whether she was having a boy or girl was driving me nuts! I can't imagine the anxiety her and her husband felt waiting for that day...

As soon as I found out, I bought just a few things. And I actually mean that! I definitely could have purchased more, but, for me and my impulse scrapbook buying habits, I did relatively good. But before I list out the supplies I purchased, I'll break down my thought process and how I approached this very daunting task. (Well, I'll break it down to the best of my ability.)

Baby Boy Album

I knew from the beginning I wanted a 6" x 8" D-ring binder with pocket pages as my album base. I wanted to use journaling cards. I thought these would be the easiest way for my friend to document, quickly, her son's first year.

Then came the hard part, for me at least. I had to figure out the layout and prompts to include in the album. I did some extensive research. I stalked YouTube for baby albums, baby boy albums, baby boy mini albums, etc. I checked Pinterest front to back and back to front for links to baby boy albums. I looked through various Etsy stores selling baby albums. I went to various stores, flipping through baby albums. I went as far as to photograph some for future inspiration! (Don't worry, there was no stealing of prompts, designs, etc. In fact, after I did all that, I never looked at the photos after I took them.)

Next, comes the brain dump. I wrote down different techniques, pins or blog posts I wanted to look back to, ideas I definitely wanted to include in the album, colors I wanted to use, products I wanted to make sure to include, prompts, etc. It definitely helps me to just get all this stuff down onto paper.

So, now, we're at the part of actually designing/creating the mini album. I wanted to use various designs of pocket pages. I had stacks of 5 different designs, I had my supplies I purchased for this project, I had the album itself, I had my brain dump list, I pulled stuff from my stash coordinating with the main products, I had picked kraft as my neutral color to help make the album cohesive.

Ready!

I decided to to separate the album into three sections:

Birth/Welcome to the World

Baby Boy Mini Album Baby Boy Mini Album Baby Boy Mini Album Baby Boy Mini Album Baby Boy Mini Album Baby Boy Mini Album

Monthly Highlights: A layout like this for the first 12 months

Baby Boy Mini Album

Favorites and Milestones

Baby Boy Mini Album Baby Boy Mini Album Baby Boy Mini Album

I am so, so SO proud of this mini album! This is just the first of many mini albums I see in my future! What was the most recent mini album you created? Was it for your memories or for someone else? Let me know in the comments section! I love reading your comments!

xoxo,
Heather

Supplies Bought Specifically for Mini Album

Tuesday, July 8, 2014

Make A Card Monday...On Tuesday (Again)

You guys will have to forgive me. I had every intention of posting this yesterday (Monday), but I was struggling with the quality of the photo. Unfortunately, I had to use my phone to take photos of today's card. And, as it was being mailed out the day I remembered to snap photos, I had to work with what was available.

I need a new phone anyway; one with a much better camera. It is the camera I have on me AT ALL TIMES. I don't want the fact that I don't own a DSLR to get in the way of documenting my life and blogging. Again, I apologize for the quality of this photo.

Anniversary Card 002

This card was super simple to make. I sent this to my best friend for her wedding anniversary last week. I was already running late on creating a card for her and her husband, so I needed something that wouldn't take me long at all.

This is not my standard sized card. It measures at 3.50" x 4.75". This is from my stack of pre- cut and scored card bases with envelopes. The white card front panel is mounted on a white card base. I used a Stampin' UP! clear mount stamp set. Unfortunately, it looks to be a retired stamp set because I cannot find it on the website and I don't remember the name. 

The sentiment was stamped in Coastal Cabana stamp ink  onto it's coordinating Coastal Cabana cardstock. I then used the decorative label punch to punch out the sentiment. I added faux stitching to the edge of the label with a white Gelly Roll pen. I adhered three wood veneer hearts underneath the stamped sentiment on the label.

To bring more interest to the focal point, i.e. the sentiment, I wanted to add a subtle layer. I used this patterned paper from the older Simple Stories Vintage Bliss line, but from my 6" x 6" paper pad. I cut the patterned paper label in half to give the cardstock label a shadowed effect. Before I adhered the sentiment cluster to the card panel, I wrapped metallic gold and white twine around the front panel, tying into a pretty bow. I adhered the sentiment cluster with Stampin' Dimensionals.

There was still something missing on this card. I was flying by the seat of my pants, coming up with the design as I went along. In my head, I pictured a simple card with lots of white space, but it just didn't look right. I decided to add something to the top of the card. I took the same multicolored striped patterned paper and cut a 1/4" wide strip. I adhered the strip at an angle to the top of the card. At the last minute, I decided to add that light green, almost lime green chipboard heart. This decision was purely based on the fact that my friend's favorite color is a bright, lime green. The front panel was adhered to the card base with Stampin' Dimensionals as well.

The coordinating envelope isn't shown that well in the photo, but I adhered a 1/4" wide strip of the same patterned paper on an angle to the bottom of the front of the envelope. I punched a decorative label from Coastal Cabana cardstock to write the return address. That label was also outlined in white. 

Hopefully this card provides inspiration for something quick and simple. This design would be great for an assembly line type card construction, for any event, especially thank you cards. 

What is your favorite quick and simple go-to card design? Let me know in the comments section!

xoxo,
Heather

Friday, July 4, 2014

Just Two Midwest Girls July Scrap Challenge: Sneak Peak!

Interactive

Head on over to Just Two Midwest Girls to see July's scrap challenge as well as my full layout! Every month we have a new challenge as well as a I prize. Check it out and play along!

xoxo,
Heather

Thursday, July 3, 2014

Pinterest Crafting: Happy Birthday America!


Welcome back to another monthly installment of Pinterest Crafting! It has definitely been quite a few months since I've created any projects that wasn't card- or scrapbook-related. (See my previous months' Pinterest Crafting posts here and here.)

I chose a project that would be relatively easy, because, let's face it, I've been a little absent from my blog and the last thing I need to do is tackle a project that will overwhelm me and have me running for the hills, swearing off blogging forever. So, something easy. Check.

When I was writing out my July blog schedule (isn't a schedule such as this called an editorial schedule?), I wanted to incorporate an American theme craft. I also wanted to stay away from a paper craft project, since that's what this blog is mostly about. I found this pin (and her corresponding blog post) a few months back. I knew back then, I was definitely going to feature this on my Pinterest Crafting series.

Felt Garland

Now, I had to take these photos at work, with not much light (what is it about office buildings and minimum light?), AND on an overcast day. I really, really NEED a DSLR....

This felt garland is insanely simple to make. It's one of those mindless projects that can come together while binge watching shows on Neflix (I know I'm not the only one to do that).

Here are the supplies:

Supplies

I purchased this felt a few months ago from Hobby Lobby. It's the default 9"x12" sheet of felt. I used crochet thread for it's strength, an embroidery needle, and scissors. That's all you need! Now, to make the strips of felt, I cut the felt sheet in half to make TWO 9"x6" pieces. I then processed to cut 1/4" strips (1/4"x6" strips). I eyeballed the width of the strips, but you'd want approximately a quarter- to a half-inch wide strips. When you string these bad boys onto your twine, thread, etc, make sure to fold the strip in half LENGTH-WISE before poking it with your needle to string them on your twine. Doing this gives the garland it's body or "fluff."

Felt Garland Close-Up

This felt garland is a quick and easy piece to add as party decor, to scrap rooms, to kids' rooms, as a holiday decoration, etc. It's all about the color felt you choose. When Mr. Sweet and I move and I have my own scrap area, I'll definitely be making a couple of these guys to brighten up my space.

Felt Garland

If you have any questions about this project, let me know in the comments section! Now that I've shared my red, white, and blue project with you, what is your red, white, and blue project? Let me know below!

xoxo,
Heather

Tuesday, July 1, 2014

Make A Card Monday...on Tuesday!

Today, I will be starting a new weekly series: Make A Card Monday. Now, I am fully aware it's Tuesday when I'm posting this first installment; I did not have time over the weekend to get this post typed up, so I had to postpone it.

Engagement Photo 001

This past weekend, Mr. Sweet and I attended an engagement party for one of his good friends. As always, I made a card for the event. This is actually the first card I enjoyed making in a long time, well, a long time for me.

Engagement Photo 002

This engagement card was inspired by this pin on my Cards Pinterest board. And, this lovely patterned paper inspired the colors for this engagement card. 

Engagement Photo 003

I've also been getting better at decorating the inside of my cards as well. Although, that's a much harder feat than the card front! And, I've been paying more attention to coordinating my envelopes too. 

There's my first card in my Make A Card Monday series. Have you guys made any cards lately? Link up what you've made so I can take a look!

xoxo,
Heather