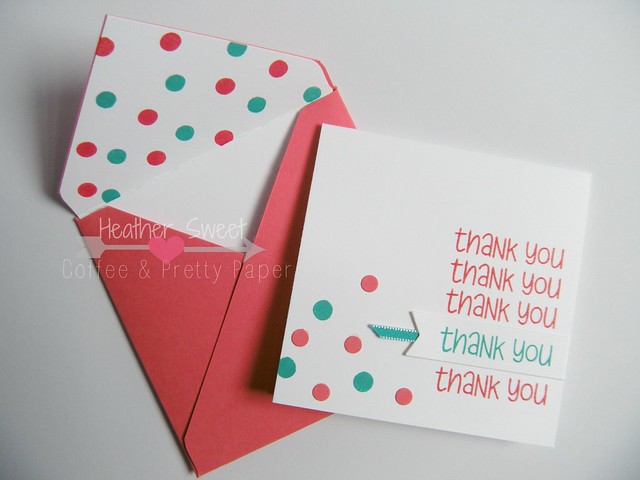
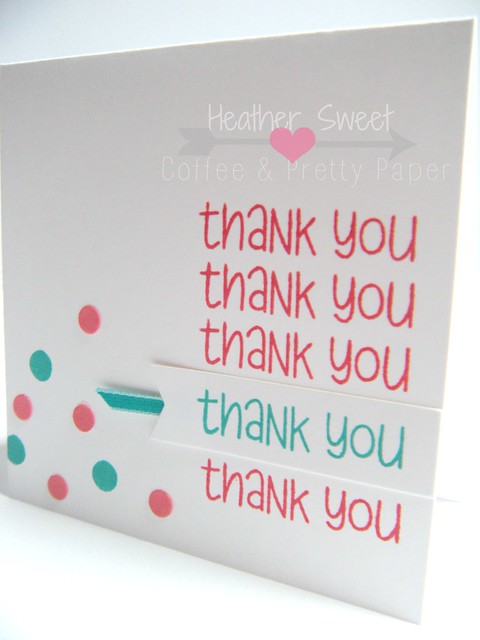
I am back with a super cute and easy square thank you card! It seems like I can never have enough thank you or birthday cards. This is something you can whip up really quickly and is perfect for assembly-card-making. It's also really simple to change out the sentiment.
How To
- Cut your white cardstock to 4" x 8". Fold in half, making the card a square at 4" x 4".
- Die cut a banner using white cardstock. Stamp the sentiment using a teal blue ink onto the die cut banner.
- Figure out where you want the banner with the stamped sentiment. This is important as it will serve as a focal point and a placeholder to stamp the additional, identical sentiments above and below the banner. Line up the straight edge of the banner with the edge of the card. Adhere onto card front. **Before you do this, make sure to adhere a thin piece of ribbon that coordinates with your stamped sentiment under the flag/pennant side of the diecut, making sure to extend the ribbon a little past the ends of your banner points. Again, this is to bring more attention to your focal point.**
- Once the banner is adhered, stamp the same "thank you" 3 times above the banner and once below in a pink stamp ink.
- Using a standard size single hole punch, punch small circles out of a coordinating pink cardstock. (Mine matched, as I was using Stampin' UP! products.)
- Sprinkle and adhere those punched circles in the opposite corner of your stamping.
- Using a similar size solid circle stamp as your cardstock circles, stamp a few circles in the same corner with a teal blue stamp ink. Make it a little haphazard or confetti-like.
- Envelope: Make using the We R Memory Keepers Envelope Punch Board-follow the measurements for an envelope that will hold a 4" x 4" card. I used the same color pink cardstock I used on the card.
- Envelope Liner: Using the same technique in last week's tutorial, I made the white envelope liner. That tutorial can be found here. On the envelope liner, I used the small solid circle stamp to stamp the confetti look in both the pink and teal blue found on the card.
Next week sometime, I will be posting a picture tutorial on using the envelope punch board to make an envelope and envelope liner. Stay tuned for that!
So, there you have it. I quick and simple thank you card! I do have to say, I really enjoy this square size. I will definitely be making more square cards. Too bad that weren't such a hassle to mail though. Won't stop me from making someone's day with pretty happy mail!
What unusual size cards have you guys been making lately? Let me know down below!
xoxo,
Heather
Supply List
Supply List
- heavy weight white cardstock
- So Much To Say Clear Stamp Set, Lawn Fawn
- Stitched Journaling Card Lawn Cuts, Lawn Fawn
- Bermuda Bay Stamp Ink, Stampin' UP!
- Bermuda Bay 1/8" Taffeta Ribbon, Stampin' UP!
- Strawberry Slush Stamp Ink, Stampin' UP!
- Strawberry Slush 8.5" x 11" Cardstock, Stampin' UP!
- standard single hole punch
- Envelope Punch Board, WRMK